Retopology lesson notes
The Blender dev team is currently working on creating a native retopology mode with viewport overlays. So stay tuned for the next few blender updates. (This is as of March 2023)
# Retopology Theory
Retopology is an essential process in computer graphics (CG) that involves creating a new, clean topology (structure) for a 3D model with an existing, often dense, and messy topology. The goal of retopology is to create a 3D model with an optimized topology for efficient animation, rendering, and texturing. In this process, the new topology should preserve the original shape, proportions, and details of the model as much as possible.
Retopology is important in CG because it enables the 3D artist to create a model with a lower polygon count while maintaining its shape, texture, and details. This is important because it allows for faster processing of the model, which is essential for real-time rendering, animation, and games. Additionally, a clean topology helps to avoid shading issues, texture stretching, and other deformations that may occur during animation.
There are different methods of retopology, including manual, semi-automatic, and automatic techniques. Manual retopology involves creating a new topology by hand, using a 3D modeling software, to create new polygons and edge loops that conform to the original model’s shape. Semi-automatic methods use tools such as surface snapping or curve-based drawing to assist in the creation of new topology. Automatic methods, on the other hand, rely on algorithms to generate a new topology based on the original model’s surface.
The theory behind retopology involves understanding the principles of topology and how it affects the performance and visual quality of a 3D model. Topology refers to the arrangement of vertices, edges, and faces in a 3D model, which defines its structure and shape. A clean and efficient topology is crucial for maintaining the shape and details of a model, while minimizing its polygon count. Edge loops, quads, and poles are some of the essential concepts in topology that 3D artists need to understand to create optimized and efficient 3D models.
# Important guidelines!
![]()
- Create your edge flow in a way that follows the surface of your high-resolution mesh
- Stick to quads as much as you can
- Evenly space you quads as much as you can
- Don’t add extra resolution, only use as many polygons as you need to showcase the shape
- start with a lower resolution
- it’s easier to go higher than lower
- Add extra resolution in areas that will have a lot of deformation
- make sure your edge and faceloops make sense as you progress
# Retopo in blender without paid or external addons
My video -> Intro to blender retopo
Timelapse of me retopologizing a pumpkin -> (pumpkin retopo timelapse - YouTube
# Resources
Retopology for Beginners in Blender 2.8 - Retopo the Correct Way - YouTube
(4) Retopo in Blender - Retopologizing the Face - YouTube
Retopology in Blender (Beginner Tutorial) - YouTube
(3) Use My EASY Method For Retopology In Blender ! - YouTube
# Enable the following addons
![]()
- Loop tools
- F2
# Setup
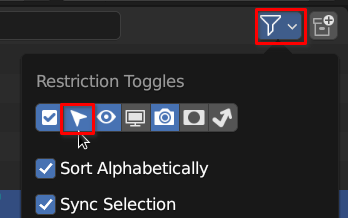
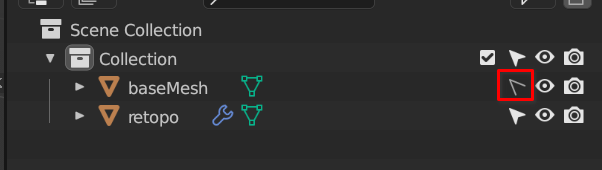
- Make base mesh non-selectable
- make a new mesh with a single quad and align it to a position where you want to start (moving it in edit mode might work better so the origin remains the same as the basemesh)
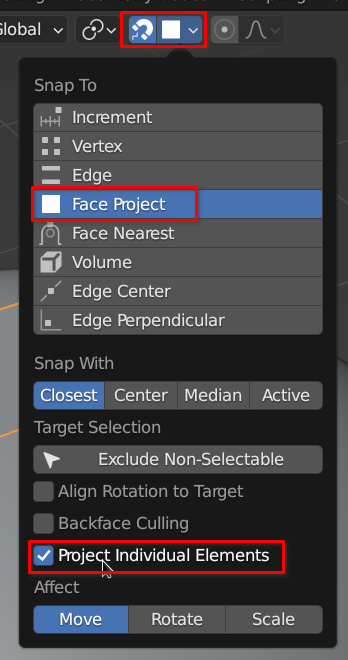
- Enable snapping to face
- and enable project individual elements
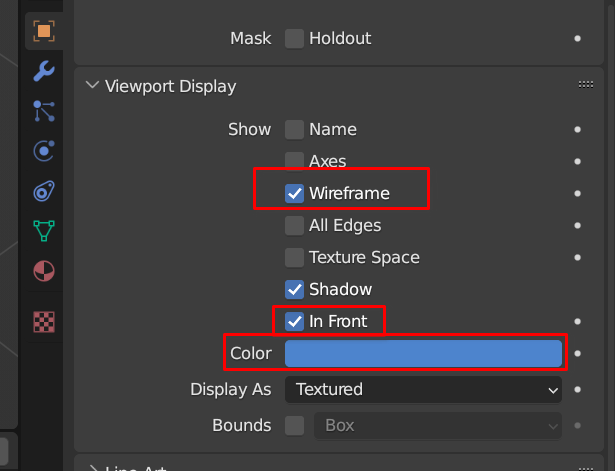
- Enable always in-front and wireframe and color for retopo-mesh in viewport display options
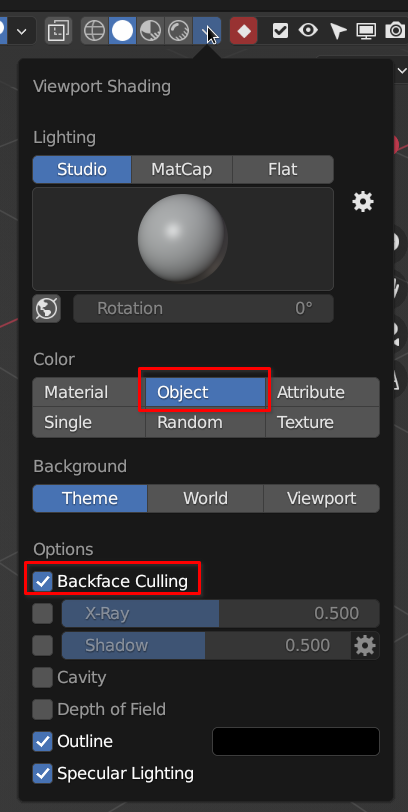
- in viewport shading enable backface culling and object color
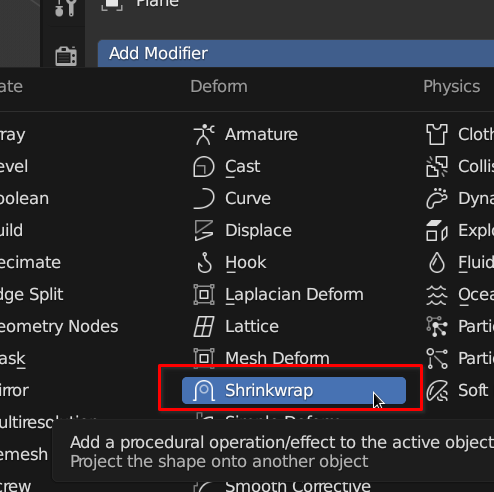
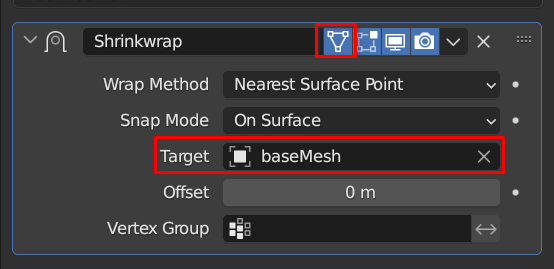
- Add shrink-wrap modifier and set the target to the base-mesh
- Make sure the cage is visible in the viewport
This is just for improved accuracy
- Optional -> Add mirror modifier
- make sure clipping and merge is enabled
- Optional -> Add displacement modifier to push the mesh out a bit along the normal if needed
Never use subd or have it on when retopologizing
You may toggle it on and off just to check if you want but that’s it. You want your mesh to look as honest as you can
A subd can give you a false view of your mesh
# Retopology work after setup
Use the following tools in the following ways:
cntrl+right-click-> to extrude to where your mouse cursor isg-> move verts and edgesg+g-> slide verts and edgescntrl+r-> add edge loop- drag after
- right-mouse to snap to center
- scroll middle mouse to add segments
e-> extrude
Use as few loops as you need and no more
Try to get your topology to have even spacing
# F2 Addon
See flipped normals video on blender retopology
Make sure it’s enabled
The F2 addon is a smarter filler tool that you will probably find yourself using all the time.
This addon ships with blender so make sure you enable it!
This only works you have 4 edges connected to a vert
Select a corner vert and hit f
# Other Tips and Tools for Retopology
- set spacebar as search menu
 +
+  -> enable x-ray
- you could also add some transparency to your viewport shader
- remap your merge hotkey to something more easily accessable
- bridge tool
- select two apposing edges and hit
f - F2 will do the same but you select one edge
- select two apposing edges and hit
- Only use subd for sanity checks
- grid-fill
- search for grid-fill
- you will have to tweak offset
- it’s in the menus
- Soft-select / proportional editing
o-> hotkey- in the menu
- different types of falloffs
- sculpt smoothing
- go into sculpting
shift-> smooth brush- or select smooth brush
f-> change brush size
- in viewport overlays enable wireframe
# Bsurfaces Workflow
This method is faster and uses an addon that ships with blender called bsurfaces
# Resources
- How to Setup Blender 2.8 for Retopology With Bsurfaces Tutorial - YouTube
- Retopology in Blender (Beginner Tutorial) - YouTube
- Blender Secrets - Retopology with BSurfaces and Annotation - YouTube
# Setup
Makes sure you enable bsurfaces in your addon preferences
- Enable bsurfaces
- Select your base-mesh
- press
 to bring up the n-panel
 - navigate to the edit tab
- open the Bsurfaces drop-down
- click the initialize (add BSurface mesh)
- This adds the shrinkwrap modifier and sets up a few other things similar to what we’ve already done
- Optional click add mirror and others button
- Click the in front checkbox to make sure the retopo mesh is always in front
- Enable back-face culling to clean up your view
- toggle the mirror modifier on and off in the viewport based on what you need
- optional change shrink-wrap modifier method to project to be a bit more accurate
- optional change color to your liking
- Now we should automatically be in annotation mode
- This addon uses the annotation tool to help you quickly create your topology
- Draw your topology lines on the surface
- Click the add surface button in the n-panel window and it will create the topology.
- Open the pop-up window in the bottom left and tweak the options.
# Ways to add geometry
- Add loose geometry
- make sure to deselect everything with
 +
+ - +
 -> temporarily enable annotate tool
 - add strokes with the annotate tool
- click add surface
- tweak the options in the popup menu
- make sure to deselect everything with
- Add to existing geo
- select one edge
- then use + to add strokes
# Other Tools
Remeshing vs Retopology
Retopology involves creating a new mesh with a clean topology that preserves the shape and details of the original model, while remeshing involves creating a new mesh with a uniform topology that is free from irregularities or holes. The goal of retopology is to optimize the mesh for animation and rendering, while the goal of remeshing is to simplify and clean up an existing mesh.
There are many tools people have built for retopology in blender. Some of the best ones are paid
I frequently will use a tool called Retopoflow
This tool works a little more like retopology modes in other 3D packages.
Another cheaper tool that is also very powerful is SpeedRetopo. This tool works more like BSurfaces than retoploflow
# Remeshing
Blender now has a voxel remesher built in. You can use it in several contexts but sometimes you just want something a little better.
Enter Quad Remeshing: Quad remeshing is an algorithmic method to remesh the surface of an object with quads. It’s quick and dirty, but can sometimes get you good enough results.
Much like auto-UVing you should only use this after you understand retopology otherwise it can be a crutch
Quad Remesherby EXOSIDE is an excelent quad remesher tool. There are plugins for almost all 3D packages.
Exocide’s quad remesher is very similar to ZBrush’s ZRemesher
Tesselator is a cheaper quad remesher addon on the blender-market.